Knowledge Base
Join NetronEats Facebook Community
Connect with a community of like-minded restaurant owners and operators sharing best practices, success stories, and insights on navigating challenges specific to your restaurant type. Stuck with a technical issue or have questions about using NetronEats? The Facebook group fosters a collaborative environment where you can get help from fellow restaurateurs and NetronEats support staff.

How to Setup NetronEats Platform?

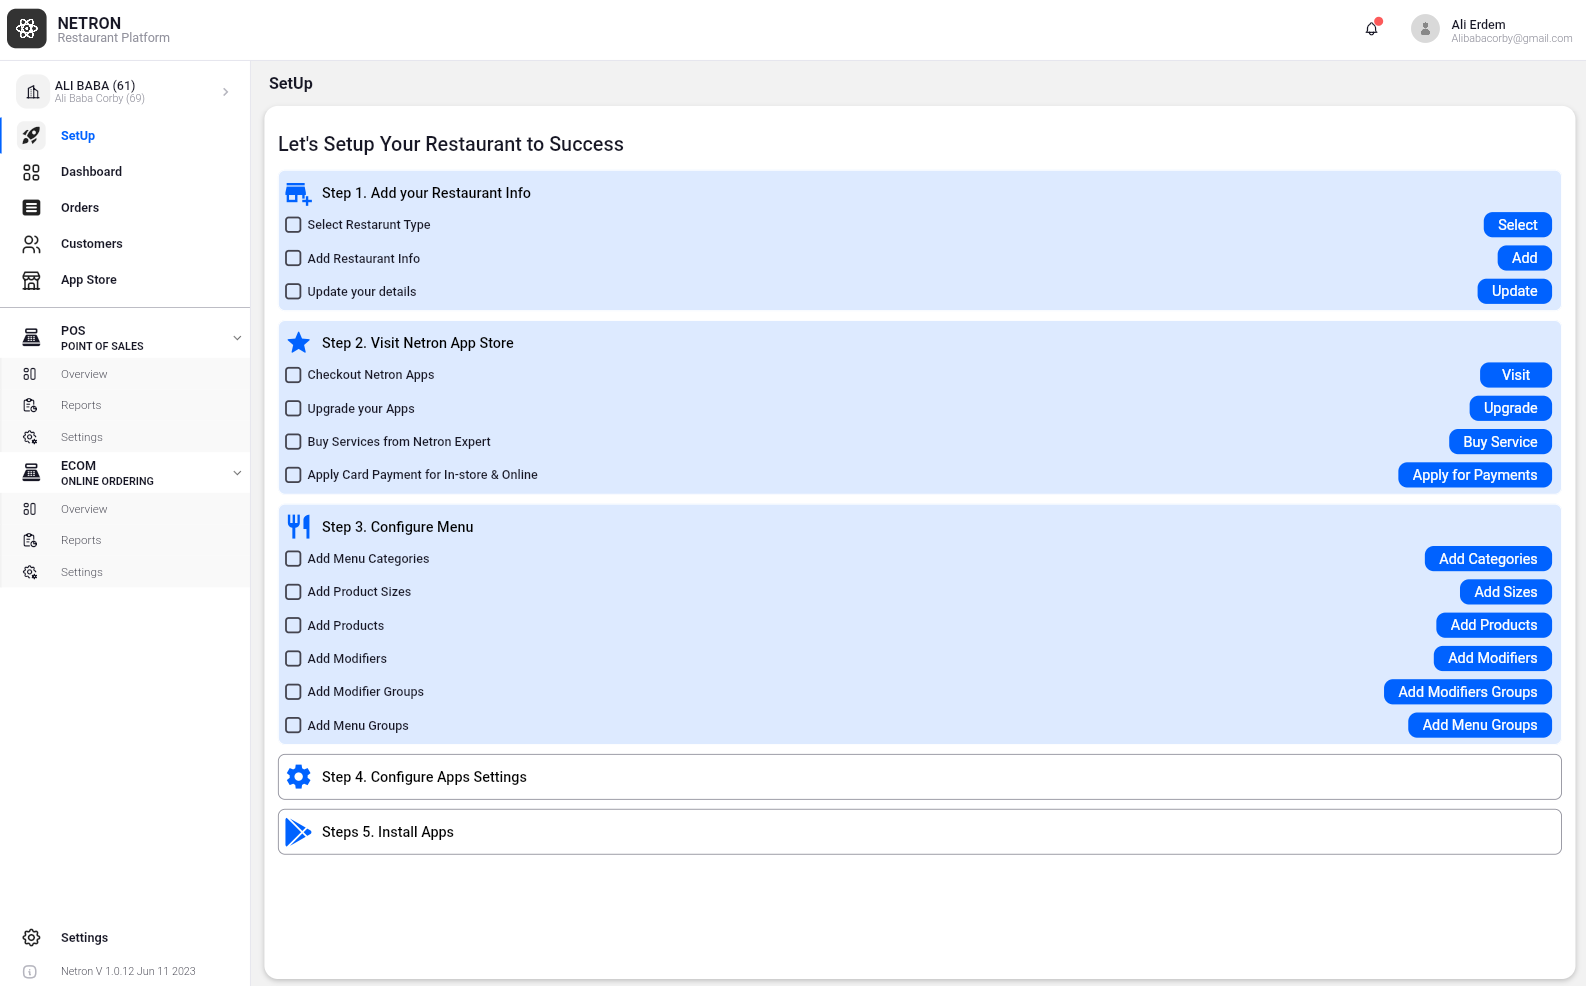
STEP 1. Add Your Restaurant Info
Welcome to Step 1 of the NetronEats Get Started Guide! In this step, you'll provide essential details about your restaurant to establish its online presence on the NetronEats platform.

1.1. Select Restaurant Type:
NetronEats understands that different restaurants have different needs. Here, you'll likely be able to choose from a variety of restaurant categories, such as:
Takeaway: If your restaurant specializes in takeout orders for customer pickup.
Delivery: If your restaurant offers its own delivery services.
Pickup: If your restaurant offers prepared meals for customers to pick up after online ordering.
Dine-in: If your restaurant offers dine-in service for seated customers.
Selecting the most relevant category helps NetronEats recommend the most suitable features and functionalities to optimize your online presence and customer experience.
1.2. Add Restaurant Information:
Now it's time to provide core details about your restaurant:
Restaurant Name: The name displayed to customers browsing the NetronEats platform.
Address: Your restaurant's physical location, including street address, city, state, and zip code. This allows customers to easily find your restaurant and potentially see distance estimates for delivery orders.
Contact Information: Provide a phone number where customers can reach your restaurant and potentially an email address for inquiries.
Website: If you have a separate website for your restaurant, you can include the URL here to connect your online presences.
Operating Hours: Specify the days and times your restaurant is open for business. This helps customers know when they can place orders or visit for dine-in service.
1.3. Update User or Profile Information:
This section might involve updating your own user profile information associated with your restaurant account on NetronEats. The specific details requested may vary, but it could include:
Your Name: The name associated with the restaurant account.
Email Address: The primary email address for communication about your NetronEats account.
Phone Number: A contact number for NetronEats to reach you regarding your restaurant account.
Password: You might be prompted to create or update your password for secure access to your NetronEats restaurant account.
By providing this information, you'll create a foundation for your restaurant's profile on NetronEats. In the next steps, you can explore additional functionalities like uploading a restaurant logo, specifying your cuisine type, and even adding a restaurant description to attract customers.
STEP 2. Visit Netron Marketplace
Congratulations! You've successfully added your restaurant's core information in Step 1. Now, Step 2 takes you to the exciting world of the Netron Marketplace, where you can unlock a variety of tools and services to enhance your restaurant's online presence and streamline your operations within the NetronEats platform.

2.1. Netron Marketplace Offerings:
The Netron Marketplace is a one-stop shop for various apps and services designed to empower your restaurant's success:
Netron Apps: Explore a range of apps specifically developed to complement your restaurant's needs. These might include:
NetronEats ECOM: A branded online ordering system with a mobile app and website, allowing customers to browse your menu and place orders conveniently.
Netron POS (Point-of-Sale): A mobile or tablet application to process customer orders, accept payments, and manage customer interactions at your restaurant.
Netron KDS (Kitchen Display System): Streamline kitchen operations by wirelessly transmitting order details to kitchen printers, ensuring chefs know exactly what to prepare for each order.
Netron RESERVE (Table Reservation): Allow customers to book tables at your restaurant through your branded website or mobile app, reducing wait times and improving the dining experience.
Netron Services: The Marketplace might offer additional services to support your restaurant's setup and ongoing operations, such as:
Installation and Menu Entry Services: NetronEats might provide assistance with installing Netron server software and uploading your restaurant's menu onto the platform.
Monthly & Yearly Support Plans: Gain access to ongoing support from the NetronEats team to address any questions or issues you encounter while using the platform.
Netron Expert (Partner) Service: This could be a program that connects you with experienced NetronEats partners who can provide consulting services tailored to your restaurant's specific needs. These partners might offer expertise in areas like online marketing strategies within the NetronEats ecosystem or optimizing your restaurant's NetronEats profile for maximum customer visibility.
2.2. Upgrading Apps and Expanding Services:
The Netron Marketplace might allow you to upgrade your free NetronEats apps to PRO versions, potentially unlocking additional features and functionalities. Explore the available options to see if there are PRO features that align with your restaurant's goals.
2.3. Card Payment Services:
Applying for card payment services through the Netron Marketplace might enable you to accept credit card payments both online through your NetronEats ECOM app and in-store using a card processing machine integrated with the NetronEats platform. NetronEats likely partners with specific payment processors, so carefully review the terms and fees associated with these services before applying.
Remember: The availability of specific apps, services, and payment processing options might depend on your region and your NetronEats plan. Carefully explore the Netron Marketplace offerings and consult NetronEats documentation or support for clarification on pricing and availability.
STEP 3. Configure Menu
Step 3 of the NetronEats Get Started Guide delves into configuring your restaurant's menu on the NetronEats platform. This is a crucial step in attracting customers and showcasing your culinary offerings. Here's a breakdown of what you can expect in this stage:

Building Your Menu:
The NetronEats platform likely provides a user-friendly interface to build your menu step-by-step. Here's a possible sequence:
Add Menu Categories: Start by defining broad categories to organize your menu items. This could include categories like Appetizers, Main Courses, Desserts, Drinks, and so on. Categorization makes it easier for customers to browse your menu and find items they're interested in.
Add Product Sizes: If your menu items come in different sizes (e.g., small, medium, large for drinks), you can define these size options here. This allows customers to customize their orders according to their preferences and appetite.
Add Products: Now you'll be able to add individual menu items to your restaurant's NetronEats menu. For each product, you might be prompted to enter details such as:
Product Name: A clear and descriptive name that accurately reflects the menu item.
Description: A brief description to entice customers and provide additional information about the ingredients or preparation method.
Price: The price of each menu item for each size defined earlier (if applicable).
Image (Optional): Uploading high-quality images of your menu items can significantly enhance customer appeal and encourage orders.
Add Modifiers: Many dishes can be customized with additional ingredients for an extra fee. Here, you can define modifiers such as extra cheese, bacon topping, or different sauces for customers to add to their orders at an additional cost.
Add Modifiers Group: To organize your modifiers efficiently, you can group related options together. For example, you might create a "Pizza Toppings" group to include all possible toppings customers can add to their pizzas.
Add Menu Groups (Optional): This feature might allow you to create specific menus for different occasions or customer segments. For instance, you could create a "Lunch Specials" menu group featuring discounted lunch combos or a "Kids Menu" group with smaller portions and options tailored to children's preferences.
Remember: Adding clear descriptions, high-quality images, and accurate pricing information is essential for creating an appealing and informative menu that entices customers to order from your restaurant on NetronEats.
By carefully configuring your menu within the NetronEats platform, you set the stage to showcase your culinary creations and attract customers to your restaurant online.
© Copyright 2022. Netron LLC. All rights reserved.


